Mastering Scalability: How to build a Load-Balanced EC2 Application in a Private VPC Subnet with AWS Auto-Scaling Groups


INTRODUCTION
AWS offers a lot of exciting resources and for a cloud beginner or someone unfamiliar with AWS, it could be a bit daunting.
I’ll be walking you through how I created a load-balanced application -(an Nginx webserver) on two EC2 instances located in my VPC private subnet using autoscaling groups and ensured that each server displayed its IP address.
In this article, you will learn the basics of setting up your network in your VPC, creating an application load balancer, and provisioning instances using an Auto-scaling group.
Prerequisites:
An Amazon AWS account.
Basic knowledge of Amazon EC2 instances.
Basic networking knowledge.
STEP 1: CREATE AND CONFIGURE A VPC.
To start we need to create and configure a VPC where our instances and load balancer will be located.
Every AWS account has a default VPC in each region -their private network, best described as your cloud within the AWS ecosystem connecting your personal resources. For this project, we would create another VPC.
On your AWS management console, visit the VPC dashboard and click Create VPC. This article explains the step-by-step process of VPC creation.
For the number of availability zones select two. Each availability zone comes with a private and a public subnet. Our load balancer would be located on the public subnets while our instances will be on the private subnets. Resources on the public subnet would have access to the internet using an internet gateway while those on the private subnet would have access to the internet via a NAT gateway attached to the public subnet.
For NAT gateways, choose the number of AZs to create NAT gateways, in this case, in 1 AZ.

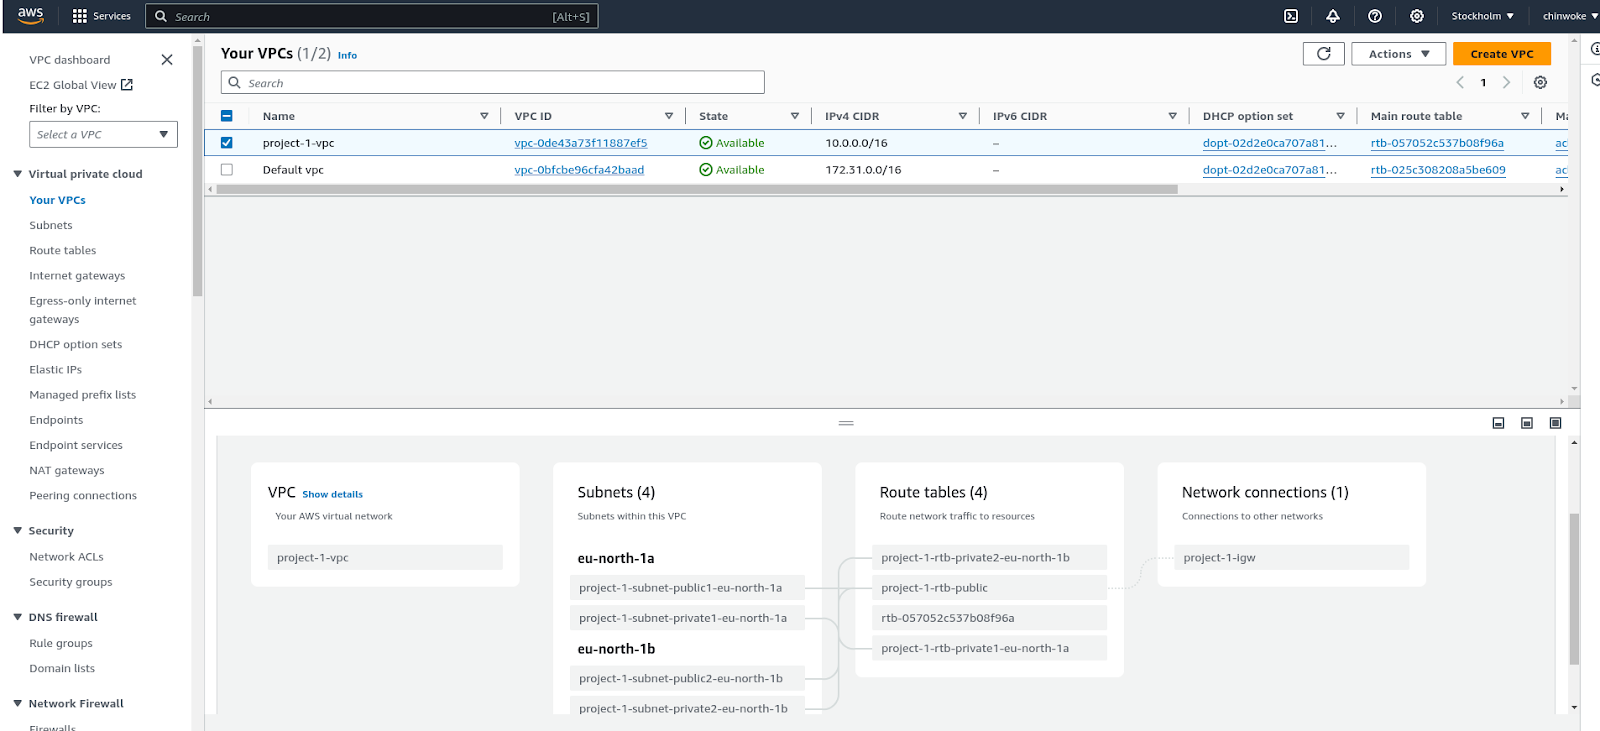
After creation, you should have a setup similar to the one below;
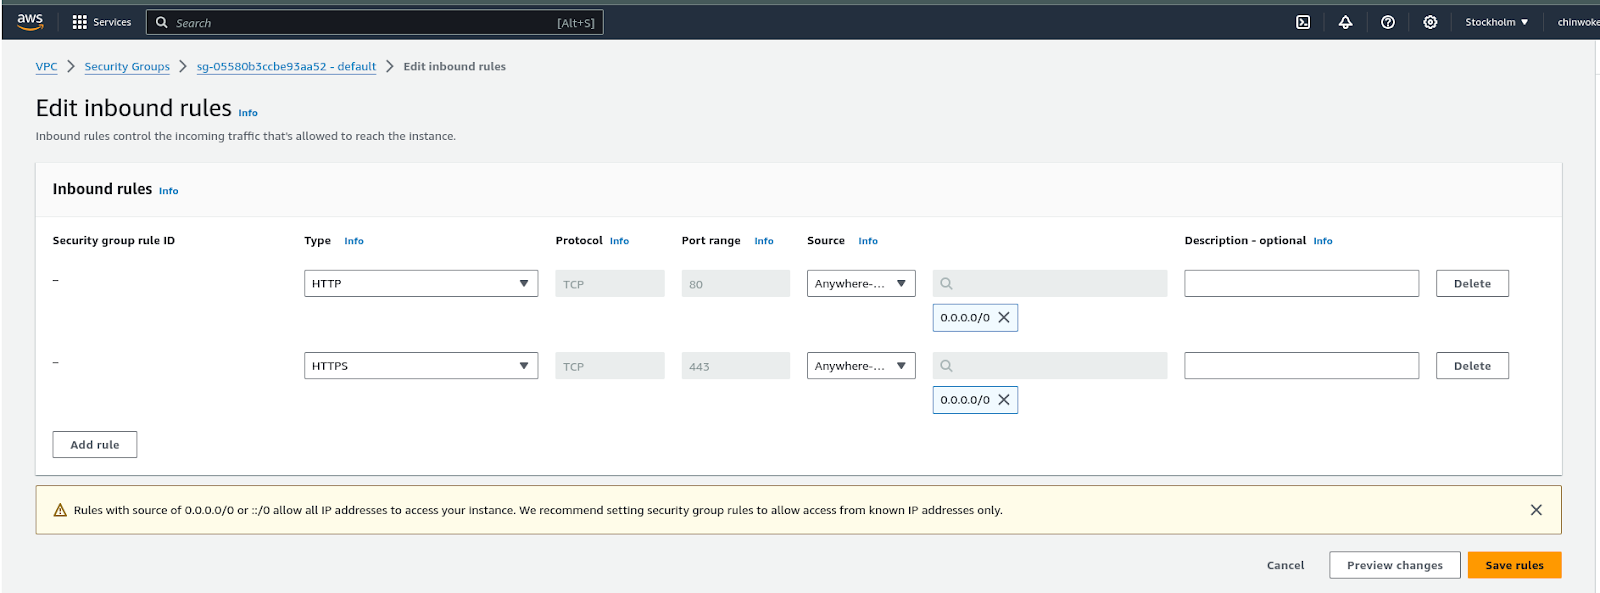
- Setup security group rules
Our vpc comes with a default security group so we have to edit security group rules to allow inbound HTTP and HTTPS traffic to resources within our network.
STEP 2: CREATE A LAUNCH TEMPLATE
Since more than one instance is required, it is recommended to make use of autoscaling groups. Autoscaling groups would enable us to scale our instances as required, either up or down, instead of manually creating the instances as needed. To use autoscaling groups, we need to set up a launch template for our instances.
A launch template is a set of instructions containing specifications on how we want the instances within our network provisioned when launched. It contains details like AMI image type, the size of the instances, network settings, etc. To create a launch template:
On the EC2 console, click on launch template. On the launch template dashboard, select Create launch template.
Type in the name you’d like to use for your template along with the description and click the check box under Auto Scaling guidance.
Under AMIs, select Ubuntu and then choose your preferred instance type.
Do not select any option under key pair as we wouldn’t be ssh-ing into the instances
Under network settings, select the private subnet address of the VPC we created. Click existing security groups and select the security group with the rules we set up earlier.
Go to user data in the advanced details section and paste the following bash script to install nginx on our instances on boot:
#!/bin/bash
#bash script to install an nginx server
sudo apt-get update -y
sudo apt-get install nginx -y
#start up nginx
sudo systemctl start nginx
sudo systemctl enable nginx
#echo a command to show the hostname at the default start page
echo "This is $(hostname -f)" > /var/www/html/index.html
Click on Create Launch Template.
STEP 3: CREATE AN APPLICATION LOAD BALANCER AND TARGET GROUPS.
On your EC2 console, Select load balancers. The load balancers dashboard would appear empty as we don’t have any load balancers running, click on create load balancers.
In the load balancer type, select application load balancer
Type in the name of your load balancer and set the scheme to internet-facing.
In the network mapping section, select the VPC we created in step 1 above, the two availability zones, and then the public subnet within each.
Select the security group we created in step 1.
In the listeners and routing section, set your load balancer to listen for HTTP traffic on port 80 and select create target group to create an instance group where the traffic is routed.
A new tab to create target groups should pop up. Under type, select instances, then put in the name of your target group and select the VPC we created. Click next.
Under registered targets, we would see no registered instances because we haven't created our instances yet. Click create target group.
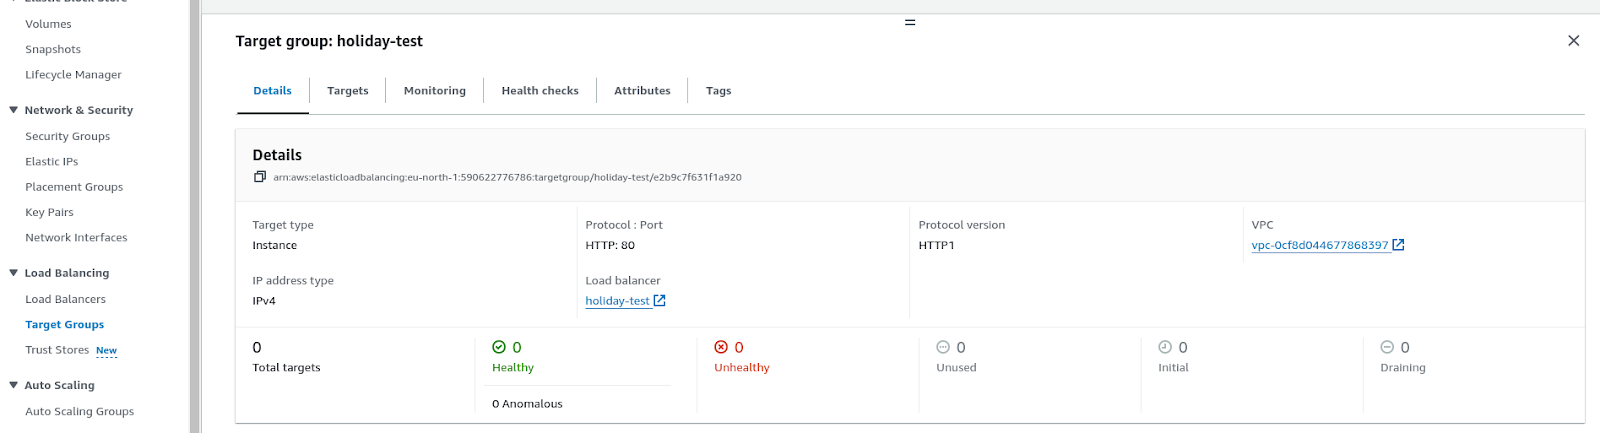
Once created, return to the load balancer console and refresh target groups. Our newly created target group should appear in the list of options, select it.
Click on create load balancer.

STEP 4: CREATE AN AUTOSCALING GROUP.
An Auto Scaling group is a collection of Amazon EC2 instances that are treated as a logical unit. You configure settings for a group and its instances as well as define the group’s minimum, maximum, and desired capacity. As mentioned earlier in step 2, auto-scaling groups make use of launch templates to create instances.
On the console, click on autoscaling groups and select create Auto-scaling group. A setup window appears; enter the name of your autoscaling group and select a launch template (select the launch template created in step 2). Click next.
In the choose launch options menu, DO NOT OVERRIDE LAUNCH TEMPLATE and go to Network. Select the VPC you created and select the availability zone. For subnets, select the private subnet where our instances will be launched.
In Configure advanced options, select attach to an existing load balancer and select the load balancers that you want to attach to your Auto Scaling group (we created this in step 3).
Enable health checks for your Load balancer.
Configure group size and scaling. Since we are working with only two instances, set the desired capacity to 2. The min desired capacity to 1 and max desired capacity to 2.
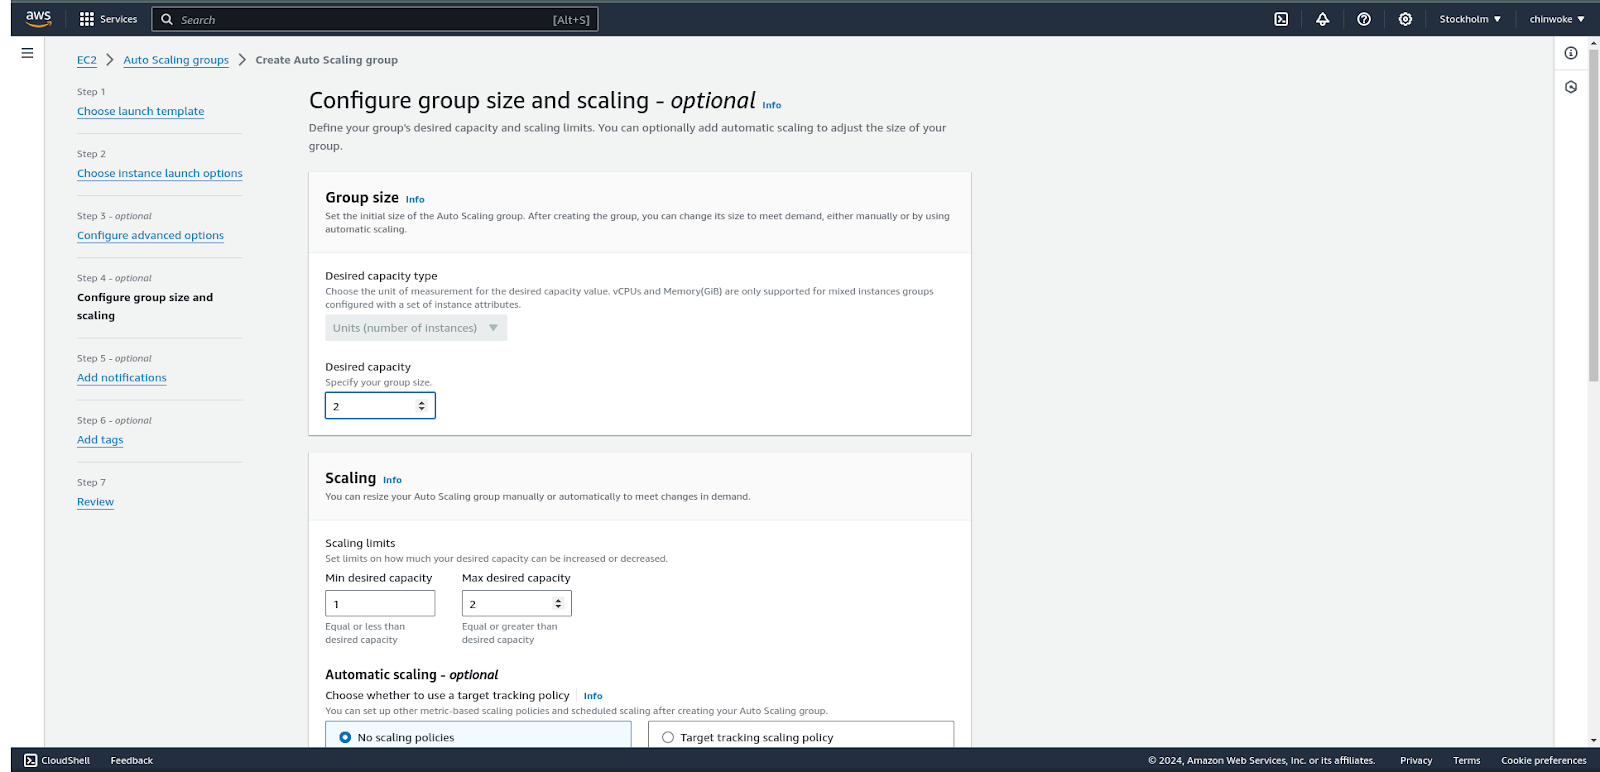
This way our auto-scaling group spins up a maximum of two instances at any given time and a minimum of one.
- Review your Auto-scaling group, click create, and wait while your Auto-scaling comes online.
To confirm that your Auto-scaling group is working, go back to the instances dashboard where you should see two instances already running. These were created from the launch template we used to create the Auto-scaling group.

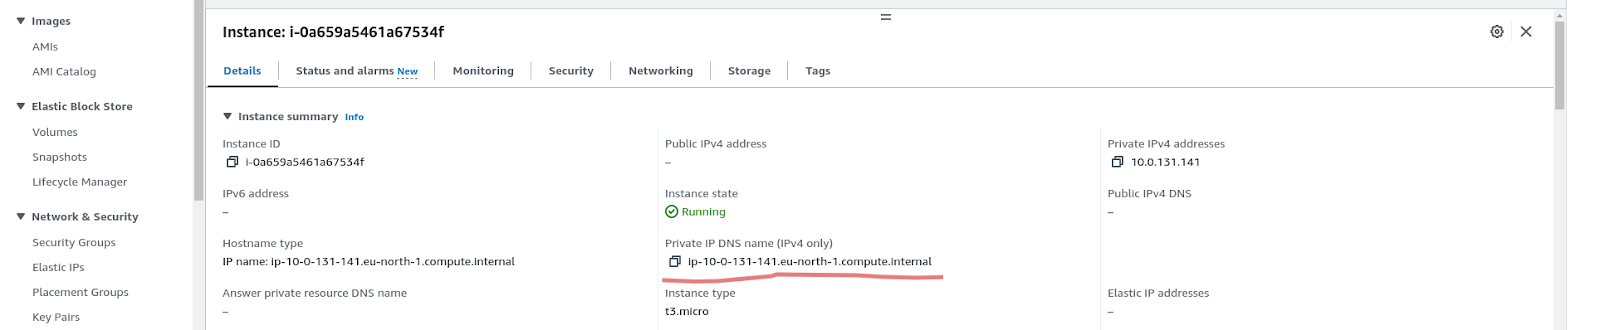
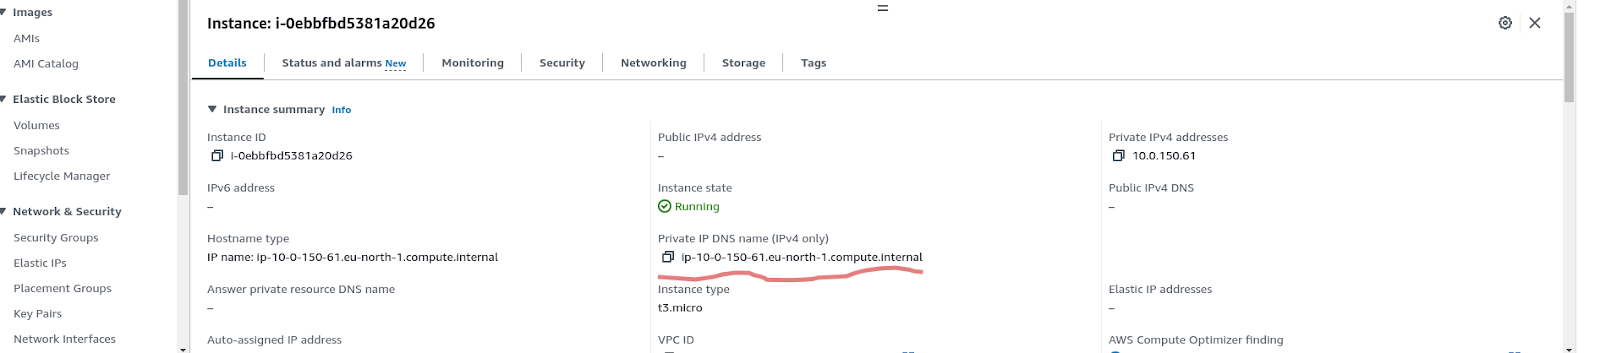
In your instance details, confirm that both instances are not mapped with public IP addresses only private IPs.
STEP 5: TESTING THE LOAD BALANCER
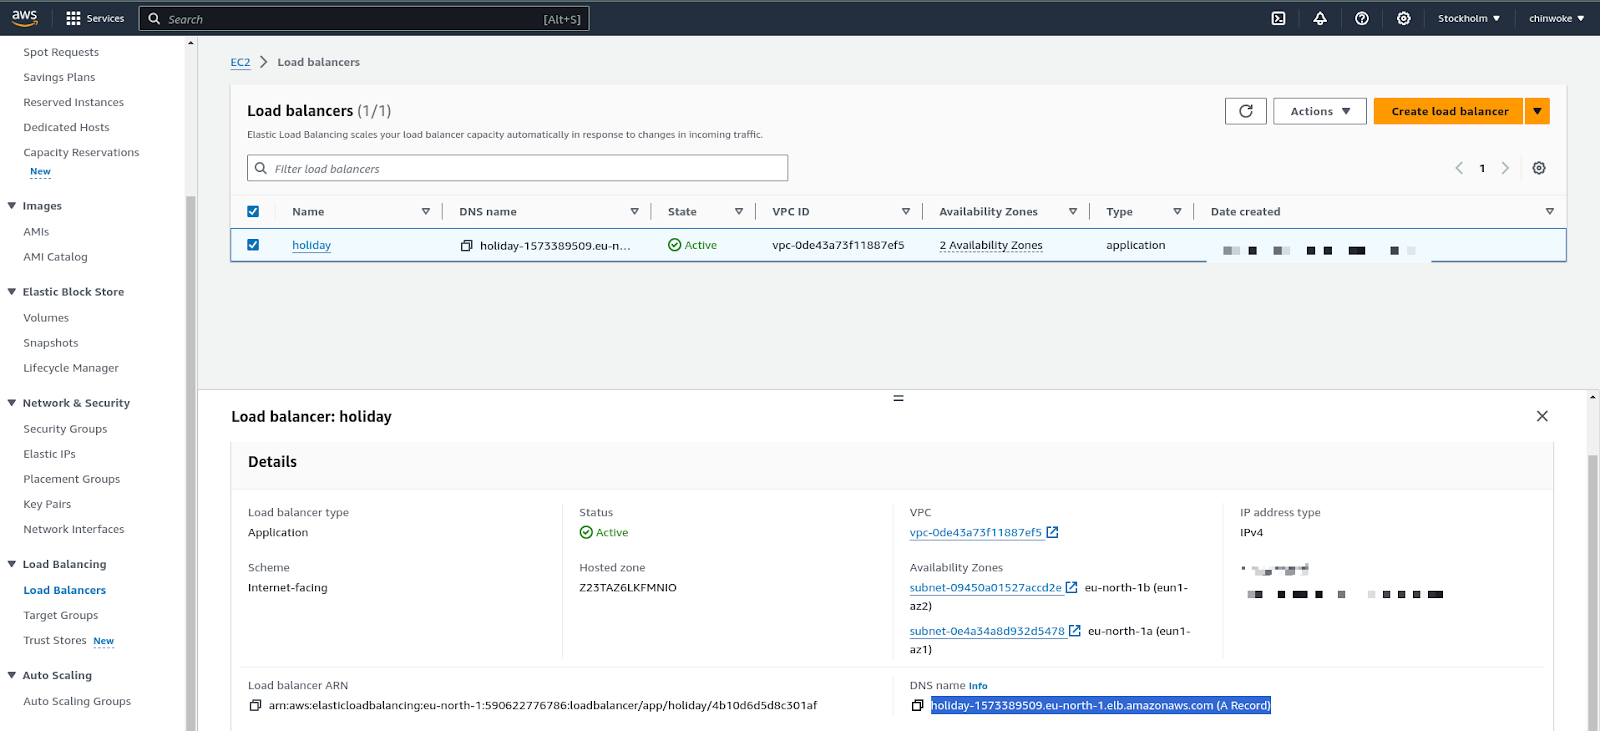
The moment of truth. To see if our load balancer is functioning properly, on the Load balancer dashboard, click the load balancer we created for this project. In the details section, copy the load-balancer public DNS address (I highlighted it in blue);
And paste into a new tab on your browser. You should be able to access the first instance showing a simple webpage identifying the host machine via the private IP address:

To access the second instance, simply refresh the page and we see that the host machine IP has changed, meaning our load balancer routed traffic to the second instance. Our load balancer is functioning!

CONCLUSION
In real-life scenarios, you’ll need to create and manage multiple servers, sometimes with huge traffic hence knowledge of VPCs, load balancers, and Aws autoscaling groups would prove useful if your company works within the AWS ecosystem. Working on this project was an interesting challenge for me and I hope this helps you find your way a little bit around aws.
After testing, don’t forget to clean up your working environment to avoid unexpected charges. Have fun testing!
FURTHER READING